My Curated Tastes is reader-supported. When you buy through links on our site, we may earn an affiliate commission at no extra cost to you. As an Amazon Associate I earn from qualifying purchases.
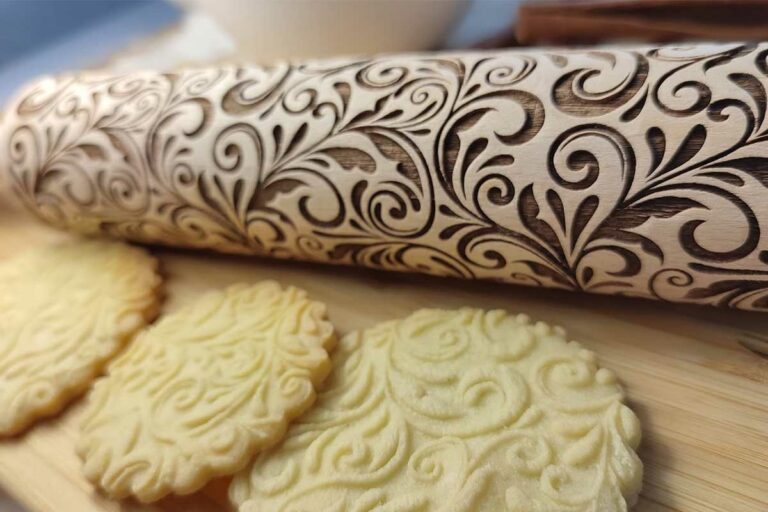
Everyone loves a shortbread cookie. They are buttery and slightly crisp on the outside. Always reminds me of the holidays since so many people will make batches of these as gifts. If you want to really impress those on your cookie gift list, embossing them is the coolest thing you will ever do. It is easy, adds no extra work to making your cookies and only requires a special embossing rolling pin. They aren’t expensive at all and they come in all different kinds of prints so you can use them all year round. Personally, I think embossed rolling pin shortbread cookies are genius.
This is a basic recipe and very hard to mess up… LOL. So make a batch (or several) and enjoy them yourself or gift wrap them as gifts. For tips on wrapping your cookies, head over to my post on Wrapping Candy, Nuts & Baked Goods for some inspiration. Have fun with this recipe, your friends, family and coworkers are going to love these.

Embossed Rolling Pin Shortbread Cookies
Nutritional information is only an estimate. The accuracy of the nutritional information for any recipe on this site is not guaranteed.
Ingredients
- 1 Cup Butter, softened
- 1 1/2 Cups Confectioners’ sugar, sifted
- 1 Egg
- 2 1/2 Tsp. Pure Vanilla extract
- 3 1/4 Cups All-purpose flour
- 1/2 Tsp. Kosher salt
Instructions
- Preheat oven to 350°F.
- Using a stand mixer, cream the butter and sugar together. Add the egg and extract and mix until well combined. Sift in flour and salt and mix well.
- Divide the dough into 4 pieces. Form into flat disks. Wrap each piece in plastic wrap and refrigerate the dough for 30 minutes.
- Lightly flour a regular rolling pin and the surface you’ll be rolling the dough out on. If dough seems too firm to roll, allow it to soften for a few minutes at room temperature. Add one piece of dough to floured surface and with the regular rolling pin, roll dough out to just over ¼” thick and about the width of the embossing rolling pin. Sprinkle the top of the dough lightly with flour.Also, lightly flour the embossing rolling pin. Take your embossing rolling pin and press down hard so you can really see the design when finished. Slowly roll the Embossing Rolling Pin evenly over the dough.
- Use a 3-inch round or square cutter to cut out cookies from the printed dough. Re-roll scraps of dough with the regular rolling pin, dust with flour and repeat with the embossing rolling pin and cutter.
- Place the cooking on a baking sheet covered in parchment paper and put in the refrigerator for 20 minutes to let the cookies set.
- Bake cookies for 12-15 minutes or until edges are slightly browned. Remove cookies and place on a cooling rack to cool.
- Repeat all steps with remaining dough, rolling one piece of dough at a time. Serve and enjoy!


9 thoughts on “Embossed Rolling Pin Shortbread Cookies”
This “dough” did not come together. Think pie crust before you add water to bring it together. It was crumbs, no matter how long I mixed it. I hate wasting things. So I added more butter about 1/3 cup more. It made a dough and the cookies tasted fine like short bread.
I’m so sorry this didn’t work out for you but it sounds like you had an amazing, on the fly save. Thanks for sharing.
I had the same issue as the other commenter…. dough was crackey and dry. maybe the poster accidentally wrote in extra flour or not enough butter?
My dough turned out perfect and came together great! This was so much fun to make with my grandson. Thank you!
This recipe worked well if you follow the directions as written. The cookies were delicious and a big hit with the family. I made a double batch and they’re still asking for more!
Thanks, Holly. Glad to hear you enjoyed them!
You are so welcome! Glad you and your grandson had fun. FYI: If you use a heart shaped cookie cutter, this are great for Valentine’s Day too!!!
How long could I freeze these for, if needed to prep ahead of time??
Hi Rebecca: I’ve frozen the dough for up to two months with good results. If just refrigerating, I’d roll and cut the dough within two – three days.